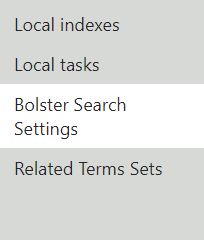
Bolster Search Settings
At the heart of the Bolster Search enhancement are the Bolster Search Settings. These settings define field mappings, boost settings, facets, and search result formatting. You need to configure these search settings so they can be applied to any search index.
To configure these settings, go to the Smart Search application in Kentico and open the Bolster Search Settings tab.
Create new settings
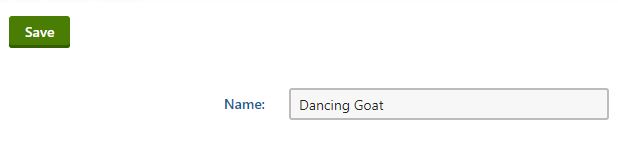
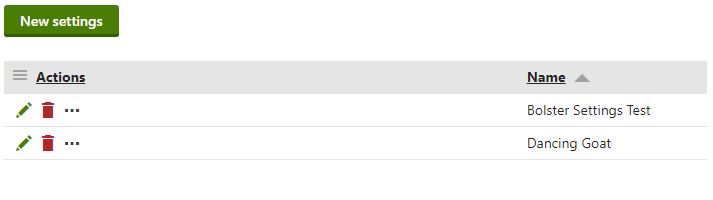
The first thing to do is to create new settings. In the Bolster Search Settings tab, click the "New settings" button.
In the creation form, simply provide a unique name for the settings and save.
Multiple settings can be created with a Standard or Enterprise license. One index doesn't have to use the same configuration as every other index. One settings configuration can be applied to multiple indexes.
Now that you've created new settings, you can configure them to meet your needs.
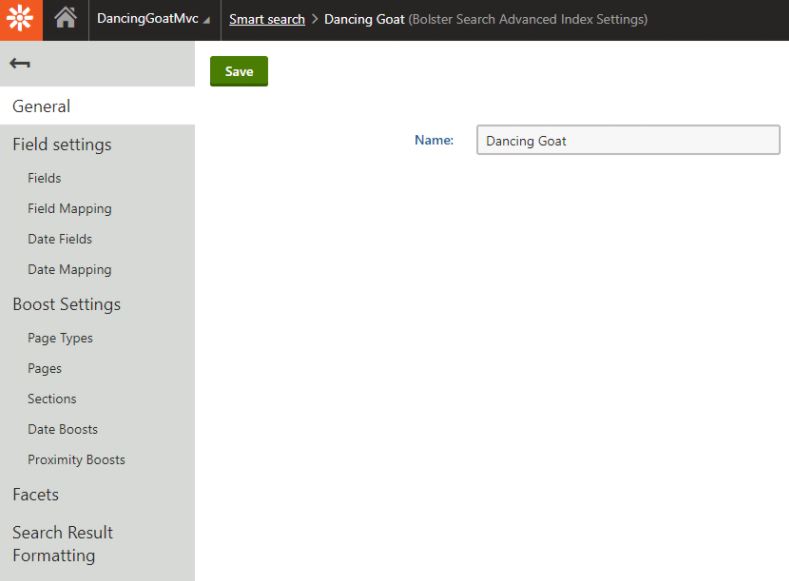
Edit settings
In the Bolster Search Settings tab, edit the new settings to begin configuring the deeper settings, like field mappings and facets. The resulting screen will look like this:
Configuring Lucene fields
A Lucene search index stores content data in fields. Bolster gives you the capability to manage Lucene fields in the Fields interface.
To configure these fields, open the Fields tab under the Field settings expandable tab.

A set of default fields were created when the Bolster Search Settings object was created. This is the full list of default fields:
- _content
- _title
- _file
- _keywords
- _summary
Each field is designed to store a piece of information about a content page.
Several other fields exist by default to support Kentico's e-commerce features. These functionality behind the SKU-related fields are only available with the Enterprise license.
Default fields
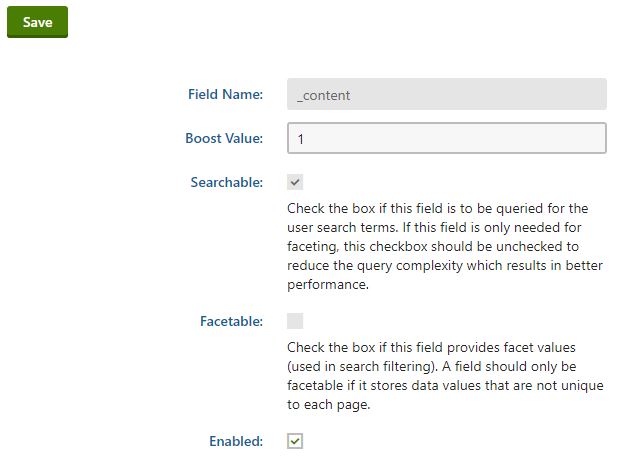
You'll notice that the only enabled properties in the edit form are "Boost Value" and "Enabled. The default Lucene fields cannot have its properties changed except for the boost value.
Boosting fields
Lucene search syntax allows for boosting individual fields in a search query. Therefore, different fields have different effects on the relevance score of a search result.
You may change the boost value to any desired value. Acceptable values are any positive number, including zero, and they can have decimal places.
Creating custom Lucene fields
You can create new Lucene fields to store specialized data. There are 2 ways to do this. The first way is through the new field creation form. The other way is explained in the Field Mapping documentation.
In the Fields tab, click the "New Field" button. In the field creation form, enter a field name, boost value, and mark if the field is searchable and/or facetable.
- Searchable: This field will be included in the search query. All searchable fields are tokenized so that partial matches can be possible.
- Facetable: This field stores information that can be used for refining search results. The facet value is actually stored in a separate Lucene field which is untokenized. A field should not be marked facetable if it stores rich text content or a unique value for each page (like an ID).
Although a field can be both searchable and facetable, it is recommended that a field not be both. Field search syntax is not supported for use in Bolster indexes since its main use is for filtering search results in the context of page searches. Faceted search capabilities provided by Bolster search should eliminate the need for field search syntax.
Performance considerations
Creating a large number of searchable fields can cause deterioration of the search performance.
You may uncheck the Enabled checkbox to disable fields, even the default ones. Disabling fields will ensure they are not used in the Lucene search query.
You will need to rebuild indexes that use these settings after any modification, except when only changing the field boost value. Changing field boost values has an immediate effect on search results.
Map Kentico page type properties to Lucene fields
To store searchable content in Lucene fields, Kentico page type properties must be mapped to these fields.
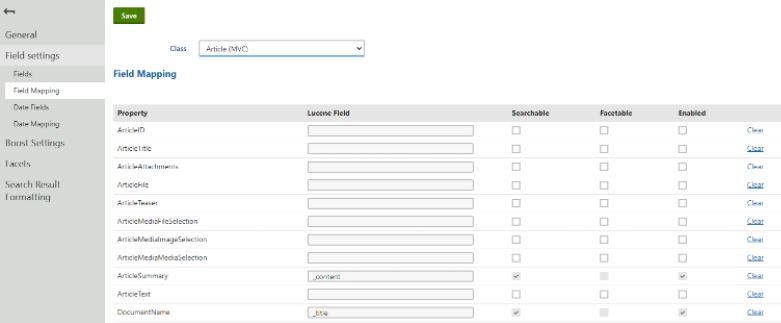
Bolster Search Settings provide a unified interface for mapping properties to fields. To access this interface, edit a Bolster Search Settings object and open the Field Mapping tab under Field settings.
Switch page types
You can manage the mappings for any page type by using the "Class" dropdown field to switch page types.
Map properties
For each page type, a set of its custom and standard properties can be mapped to any Lucene field. In the Lucene Field form control, you can select an existing field or create a new one (instructions on that below). More than one property can map to a Lucene field. After changing the configuration for a page type, be sure to save the changes by clicking the Save button.
Mapping default fields vs custom fields
After the mappings are saved, the Searchable and Facetable checkboxes will reflect what has been configured for the default Lucene fields without you having to check them yourself. You cannot change the default Lucene field behaviors here.
However, if you map a property to a custom Lucene field (one that you created in the Fields interface), you may change the Searchable and Facetable properties in this interface. Any changes made to those properties will propagate to the Fields interface and will apply to mappings of all page types.
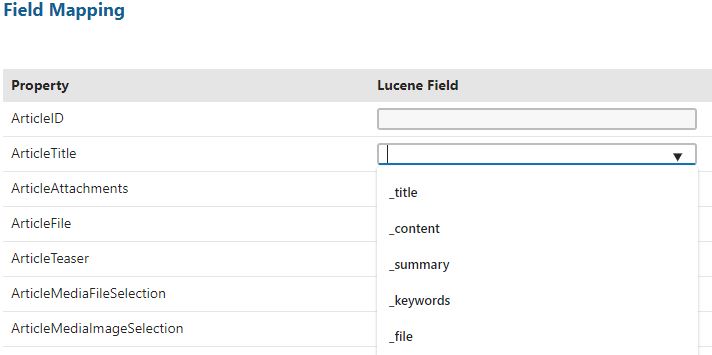
Creating new custom Lucene fields in the Field Mapping interface
The Lucene column in this interface presents a combobox control: a dropdown that gives you all the available Lucene fields with the capability of accepting text input. You may create a new Lucene field by entering a new field name in the control instead of selecting a field. You can also configure the Searchable and Facetable property here.
Once you save the mapping, the new custom field can be managed in the Fields interface and is available for mapping for all page types.
Disable mappings
Any mapping can be disabled by unchecking the Enabled checkbox. Be sure to save the change.
You will need to rebuild any indexes that use these settings after any modification to them.
Configuring Date fields
Lucene fields may be created to store date information about pages. To manage these types of fields, edit a Bolster Search Settings object and go to the Date Fields tab under Field Settings.
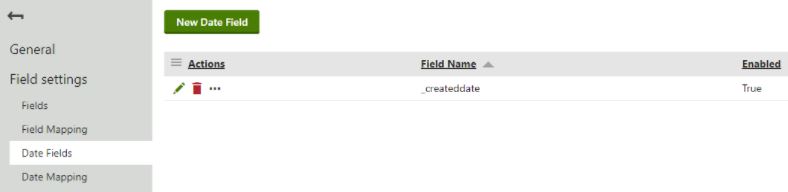
One default date field called _createddate is automatically available. More fields can be created to signify other dates that can influence the relevance of the search results.
To create a new date field, click the New Date Field button. In the creation form, simply provide a name for the date field and save.
Mapping date fields
Date fields can be mapped to page type properties. To do so, edit a Bolster Search Settings object and open the Date Mapping tab under Field Settings.
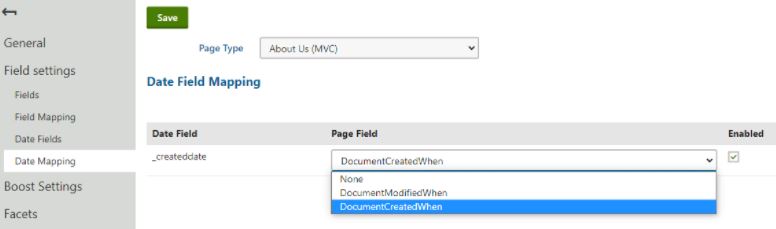
You can manage the mappings for any page type by using the "Page Type" dropdown form control to switch page types.
The date mapping interface presents the Lucene date fields in the first column. In the Page Field column, any page type property that has a datetime datatype can be mapped to the Lucene field.
Each mapping may be disabled as necessary.
You will need to rebuild any indexes that use these settings after any modification to them.
Boost settings
Note: Field boosting can be accomplished in the Fields interface. Read this documentation to see how.
There can sometimes be a need to boost a particularly important page or set of pages to the top of the search results. This can be accomplished with the boost settings provided by the Bolster module.
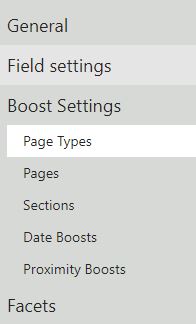
To manage these settings, edit a Bolster Search Settings object and expand Boost Settings in the left navigation, where the tabs exist for managing boosting by Page Types, Pages, Sections, and Date.
Page Type Boost
To boost search results by page type, open the Page Types tab under Boost Settings.
Click the New Page Type Boost button to open the creation form.
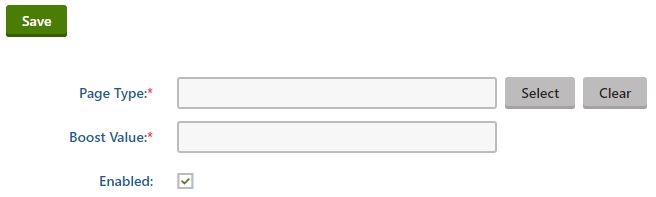
In the Page Type form field, select the page type for which you want the boost to apply.
Then provide the Boost Value. It can be a positive numeric value, including zero, and it can have decimal places.
Save the changes and go back to see the new boost setting in the listing.

You may create additional boost settings any number of page types. However, there is a limit when using a free license.
After setting up these boosts, any pages having the boosted page types will receive a boost to their relevance score in the search results.
Any changes made in this interface take effect immediately and will not require rebuilding any index.
Page Boost
Individual pages may be boosted in the search results. To do so, open the Pages tab under Boost Settings.
Click the New Page Boost button to open the creation form.
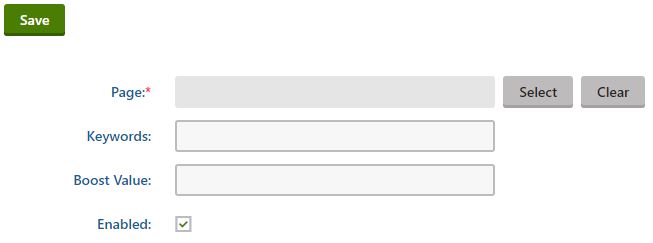
Select the page to be boosted in Page form field.
Optionally, you can limit the application of this boost only for certain keywords. For instance, if you want a page about teacher salary to receive this boost only when a user searches for "coffee", enter the keyword "coffee" into the Keywords form field. Multiple sets of keywords can be designated, separated by commas. Example: "coffee, cafe".
If no keywords are designated, the page will receive the boost regardless of what the user is searching.
Then provide the Boost Value. It can be a positive numeric value, including zero, and it can have decimal places.
Save the changes and go back to see the new boost setting in the listing.

You may create additional boost settings any number of pages. However, there is a limit when using a free license.
Any changes made in this interface take effect immediately and will not require rebuilding any index.
Performance considerations
Creating a large number of boosts can cause deterioration of the search performance. Consider limiting these boosts to pages of significant importance.
Sections Boost
Sections of the website may be boosted in the search results. To do so, open the Sections tab under Boost Settings.
Click the New Path Boost button to open the creation form.
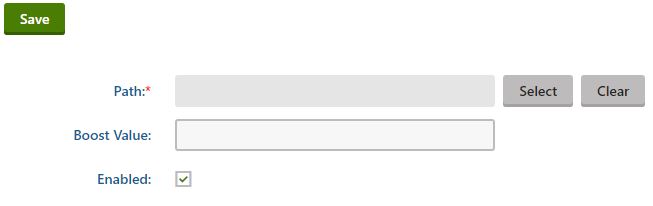
Select the path to be boosted in the Path form field.
Then provide the Boost Value. It can be a positive numeric value, including zero, and it can have decimal places.
Save the changes and go back to see the new boost setting in the listing.

You may create additional boost settings any number of sections. However, there is a limit when using a free license.
Any changes made in this interface take effect immediately and will not require rebuilding any index.
Date Boost
Pages may be boosted based on a date property. For instance, you may find it necessary to boost newer articles in the search results. To accomplish this, open the Date Boosts tab under the Boost Settings.
Click the New Date Boost button to open the creation form.
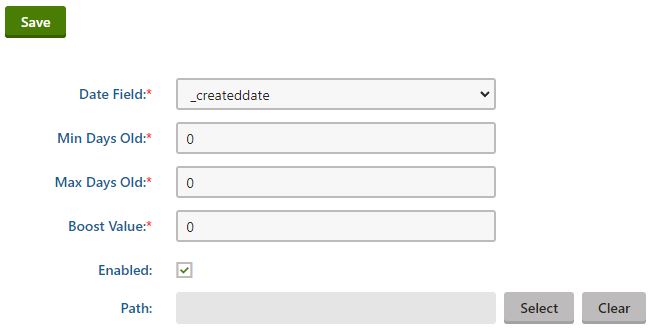
Select a Lucene date field in the Date Field form field.
For this boost to apply, the date stored in the date field must fall between a range defined by the Min Days Old and Max Days Old fields. For instance, if you want to boost a page that is between 0 and 30 days old, enter 0 in the Min Days Old field and 30 in the Max Days Old field.
Then provide the Boost Value. It can be a positive numeric value, including zero, and it can have decimal places.
Optionally, you can limit this boost to apply only to pages in a particular section of the website. Select the path of that section in the Path field.
Save the changes and go back to see the new boost setting in the listing.

You may create additional boost settings any number of date field/min-max days/path combos. However, there is a limit when using a free license.
Any changes made in this interface take effect immediately and will not require rebuilding any index.
Proximity Boosts
Users often search for terms that include multiple words. For a search configuration that matches any word in the user search terms, it is ideal to give a higher search ranking to pages that contains the exact search terms, followed by pages that contains the words more loosely associated.
Proximity boosting helps accomplish that. To see the default configuration of proximity boosting, open the Proximity Boosts tab under Boost Settings.

By default, three settings are available. A fourth can be created by you, but no more is allowed because of performance considerations.
In each of these settings, a distance and boost value is specified. Take the first setting, in which the distance is 1. This setting applies a boost to pages in which the search terms appear within 1 word of each other (basically, the search terms appear all together in the page).
For greater distances, the boost value is less, meaning that a looser association of the search terms within a page will give the page less of a boost.
For pages in which the search terms that appear far apart (not within 8 words of each other), no boost is applied.
The boost value and distance of these settings may be changed to meet your requirements.
Any changes made in this interface take effect immediately and will not require rebuilding any index.
If you notice that search performance has become an issue, it may be alleviated by disabling one or more proximity boost settings.
Configuring Facets
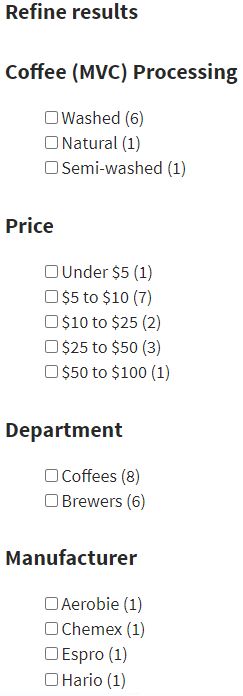
The Bolster Search module provides an interface for configuring faceted searching. The Bolster Search API not only returns search results, but the facet information along with it. With this information, you can easily implement a faceted search for the live site without any business logic; just display the search results facet values as filters and send the user's filter selections when calling the search API.
To configure facets, edit a Bolster Search Settings object and open the Facets tab.
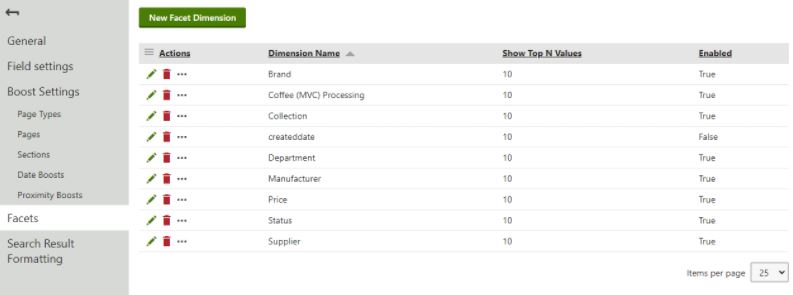
A default set of facet dimensions (essentially categories of refinement) are provided. Some of them relate to Kentico's e-commerce features, which can only be leveraged with an Enterprise license. The system also connects a facet dimension to the proper Lucene field that provides the facet values (in other words, it determines how to get the filters for the refinement category). The end result may appear like this on the live site:
Facet dimensions may be created manually, but it is easier to allow the system to create facets for you. Whenever you create a new field mapping to a facetable Lucene field, a facet dimension is created automatically. Only create a facet dimension manually if you're very familiar with how to work with this interface.
Once created, a facet dimension may be configured further to meet your business requirements.
Facet dimension editing form: content manager settings
Editing a facet dimension displays a form that consists of 2 parts. The first part is the content settings.
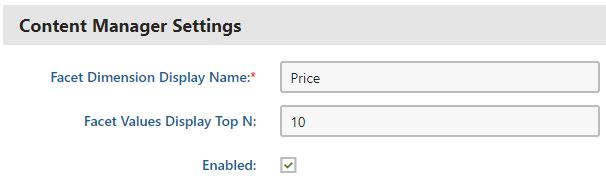
- Facet Dimension Display Name: This can be used to display a header for a set of filters pertaining to the dimension.
- Facet Values Display Top N: You can limit the number of facet values for the dimension. This can be useful if you find that the search results return too many facet values for a particular dimension. Default value is 10.
- Enabled: You may disable a facet dimension by unchecking this box.
The form fields are pre-populated when the facet dimension is created by the system automatically. The Display Name is based on the display name of the Kentico class property that was mapped to a facetable field.
Developer settings
Following the content manager settings are the developer settings that are quite technical in nature.
The first four form fields are common to all facet dimension settings:
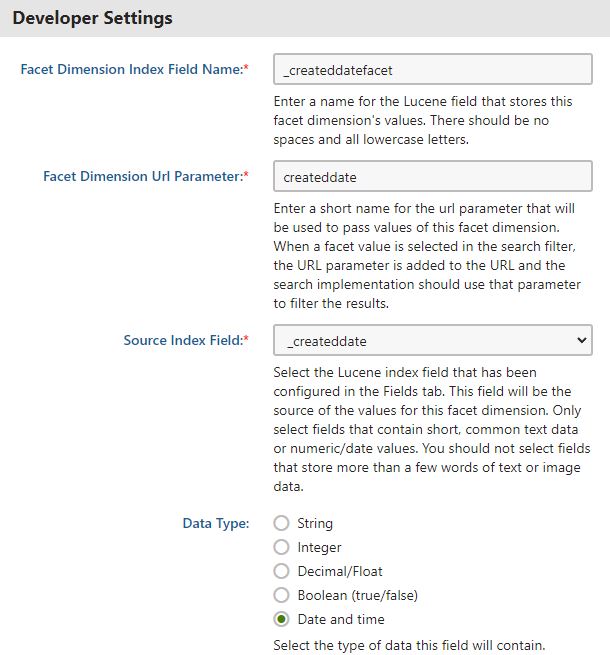
All of the values in these fields are pre-populated based on the Kentico class property that was mapped to a facetable field.
- Facet Dimension Index Field Name: The name of the Lucene field that is designated to store the facet value found in a page's property that was mapped to a facetable Lucene field.
- Facet Dimension Url Parameter: When users refine the search, the expected behavior is to reload the search results with a URL parameter that contains the chosen filters. The part of the parameter that designates this dimension is defined in this form field.
- Source Index Field: This is the facetable Lucene field that was mapped to the Kentico property that contains facet values.
- Data Type: The data type of the Kentico class property that was mapped to a facetable field. Some scenarios exist where the data type should be something other than what was pre-selected.
Following these fields are dynamic fields that appear depending on the data type.
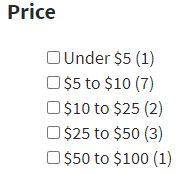
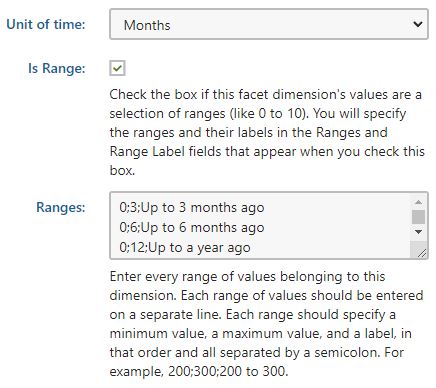
Range query designation
The following set of fields specify if there should be a range query on this dimension.
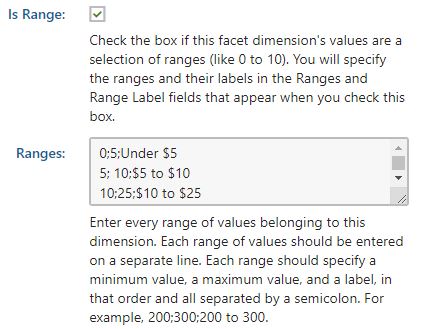
These options can apply to string, integer, and decimal/float data types. For the ranges specified in the image above, the live site can display them in a manner such as this:
Boolean options
The following set of fields appear when the boolean data type is selected.
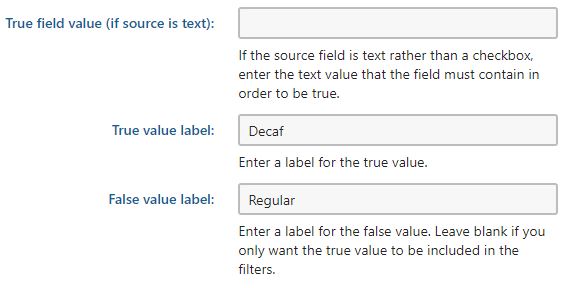
With the True field value form field, a Kentico property that stores text can have a value that would be considered the equivalent of true in a boolean filter. All other values is considered a false value. (This is an example of how a field mapping to a Kentico string property can be configured with a boolean data type in its corresponding facet dimension.)
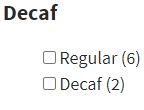
Search refinements that are based on a true/false value can be given labels to represent true or false values in the live site's faceted search filters. For instance, a coffee product may have a boolean property for whether or not the coffee is decaffeinated. Designating a text label to represent the value of the boolean property helps the user understand better what they can select for this option in the search filters. Based on the settings in the example above, the live site can show these options to the user:
Date ranges
For datetime properties, a set of filters based on date ranges can be created by configuring these settings:
You will need to rebuild any indexes that use these settings after any modification to them.
Search Result Formatting
Search results typically display the page title, a snippet of content, an associated image, and possibly a date. Within the Search Result Formatting interface, you can configure where this information comes from for every page type.
To do so, edit a Bolster Search Settings object and open the Search Result Formatting tab.
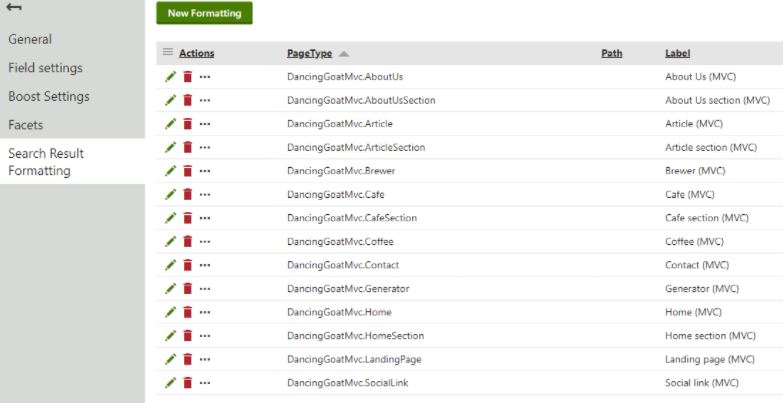
As you will see, each page type is available to be configured. Editing one of these settings will display this form:
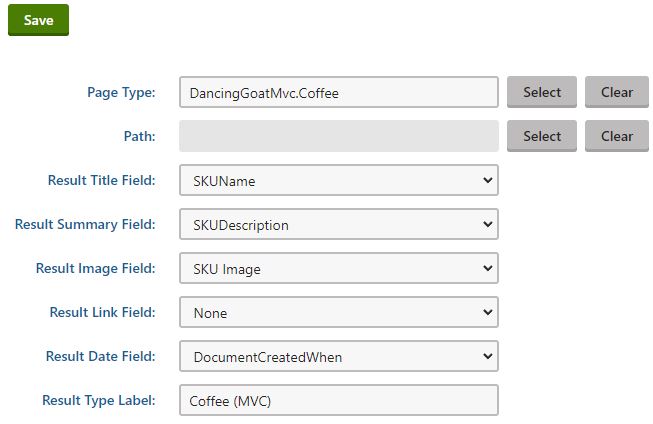
For each of the dropdown form fields, you select the Kentico property that provides the information needed for the search result title, summary, image, and date.
The Result Link Field form field allows you to select a file or attachment property of a Kentico page type. If set to such a property, the link in the search result would link directly to that file/attachment stored in the property.
The Result Type Label form field by default stores the page type display name. Your implementation of the search results page can display this information with the search result.
The Path form field can be used to limit the application of these settings to a particular section of the website. For instance, if you have a page type generically named "Page", you can specify a different search result formatting depending on where a Page is in the website.
Special Lucene fields are designated to store this information. You will need to rebuild any indexes that use these settings after any modification to them.